s3-kennisbank
Input Components
Creating a web component that is meant to be used within a form is a good way to keep the logic of each User Story separated from each other, and to keep the render method of the component that holds the form fields clean and structured. But defining such web components is not as straightforward as it might seem.
In this article we will cover the problems we face when creating input components that are meant to be used within a form and how to solve them.
Boilerplate
Let's build a simple component that gives us an Evaluation form. We will use this component as a boilerplate which we will refactor in this article to use custom components within the form.
Start by creating a new file evaluation-form.js in the src/view/components folder and add the following code:
import { LitElement, html, css } from 'lit';

export class EvaluationForm extends LitElement {
  constructor() {
    super();
    this.data = {};
  }

  static styles = css`
    form {
      display: grid;
      grid-template-columns: 1fr;
      gap: 1rem;
      margin: 1rem;
      justify-items: center;
      align-items: center;
    }

    fieldset {
      border: 1px solid gray;
      display: grid;
      width: 100%;
    }

    .cursist-info {
      grid-template-columns: auto 1fr;
    }

    .evaluation-topics {
      grid-template-columns: auto auto 1fr;
      align-items: center;
    }

    legend {
      font-weight: bold;
    }

    label {
      display: block;
      margin: 0.5rem;
      padding: 0.5rem;
    }

    input {
      margin: 0.5rem;
      padding: 0.5rem;
    }

    input[type='number'] {
      width: 2rem;
      font-size: 1.5rem;
    }

    input[type='range'] {
      width: 50%;
    }

    datalist {
      display: flex;
      margin: 0 0.5rem;
      padding: 0 0.5rem;
      justify-content: space-between;
      width: 50%;
    }

    button {
      margin: 0rem 1rem;
      padding: 0.5rem 2rem;
      background-color: green;
      color: white;
      border: none;
      border-radius: 0.5rem;
      font-size: 1.5rem;
    }
  `;

  submitHandler(event) {
    event.preventDefault();
    const formData = new FormData(event.target);
    this.data = Object.fromEntries(formData.entries());
    console.log(this.data);
  }

  render() {
    return html`
      <h1>Evaluation Form</h1>
      <form @submit=${this.submitHandler}>
        <fieldset class="cursist-info">
          <legend>Cursist Information</legend>
          <label for="name">Name:</label>
          <input type="text" id="name" name="name" required />

          <label for="address">Address:</label>
          <input type="text" id="address" name="address" required />

          <label for="phone">Phone:</label>
          <input type="tel" id="phone" name="phone" required />

          <label for="email">Email:</label>
          <input type="email" id="email" name="email" required />
        </fieldset>

        <fieldset class="evaluation-topics">
          <legend>Topics</legend>
          <label for="html-value">HTML:</label>
          <input type="number" id="html-value" name="html" min="0" max="10" required />
          <div>
            <input
              type="range"
              id="html-slider"
              name="html"
              list="values"
              aria-label="html-slider"
              min="0"
              max="10"
              required
            />
            <datalist id="values">
              <option value="0" label="0"></option>
              <option value="1" label="1"></option>
              <option value="2" label="2"></option>
              <option value="3" label="3"></option>
              <option value="4" label="4"></option>
              <option value="5" label="5"></option>
              <option value="6" label="6"></option>
              <option value="7" label="7"></option>
              <option value="8" label="8"></option>
              <option value="9" label="9"></option>
              <option value="10" label="10"></option>
            </datalist>
          </div>

          <label for="css-value">CSS:</label>
          <input type="number" id="css-value" name="css" min="0" max="10" required />
          <div>
            <input
              type="range"
              id="css-slider"
              name="css"
              list="values"
              aria-label="css-slider"
              min="0"
              max="10"
              required
            />
            <datalist id="values">
              <option value="0" label="0"></option>
              <option value="1" label="1"></option>
              <option value="2" label="2"></option>
              <option value="3" label="3"></option>
              <option value="4" label="4"></option>
              <option value="5" label="5"></option>
              <option value="6" label="6"></option>
              <option value="7" label="7"></option>
              <option value="8" label="8"></option>
              <option value="9" label="9"></option>
              <option value="10" label="10"></option>
            </datalist>
          </div>

          <label for="js-value">JavaScript:</label>
          <input type="number" id="js-value" name="js" min="0" max="10" required />
          <div>
            <input
              type="range"
              id="js-slider"
              name="js"
              list="values"
              aria-label="js-slider"
              min="0"
              max="10"
              required
            />
            <datalist id="values">
              <option value="0" label="0"></option>
              <option value="1" label="1"></option>
              <option value="2" label="2"></option>
              <option value="3" label="3"></option>
              <option value="4" label="4"></option>
              <option value="5" label="5"></option>
              <option value="6" label="6"></option>
              <option value="7" label="7"></option>
              <option value="8" label="8"></option>
              <option value="9" label="9"></option>
              <option value="10" label="10"></option>
            </datalist>
          </div>
        </fieldset>

        <button type="submit">Save</button>
      </form>
    `;
  }
}

customElements.define('evaluation-form', EvaluationForm);
Import the component in the home-page.js file of the src/view/pages folder.
import '../components/evaluation-form';
And adapt the index.html file to use the evaluation-form component.
...
<body>
  <main>
    <evaluation-form></evaluation-form>
  </main>
</body>
...
Decomposition
If you run the application you should get a form that asks for some information of the cursist (to keep the evaluation
private ![]() ) and some topics to evaluate.
) and some topics to evaluate.
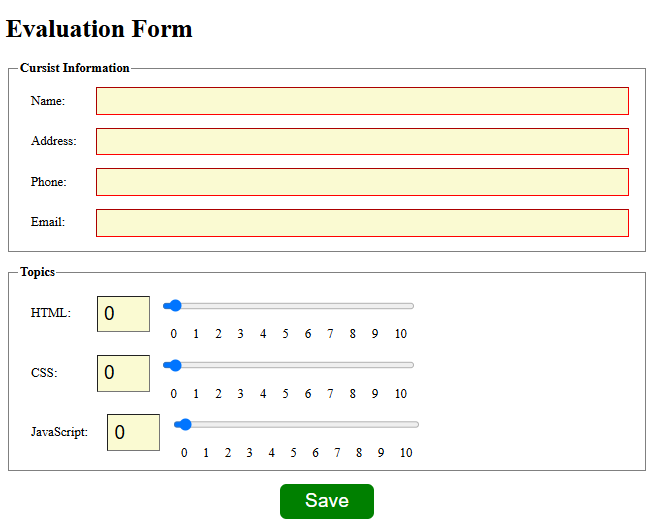
That the form is not working correctly is something we will fix later in this article. Our goal now is to refactor the
form to use custom components for the fieldsets. Each fieldset holds multiple inputs. To understand the problems we will
encounter when creating such components that holds multiple values, we will
first create a custom component that holds a single value. The inputs within the
topics fieldset are a good example of this. Since each topic has a number input and a range input that should be in
sync, representing the same value.
Sources
- MDN - ElementInternals
![]() Home |
Home | ![]() Lifecycle |
Lifecycle | ![]() Lit Web Components
| Single value input components
Lit Web Components
| Single value input components ![]()