s3-kennisbank
Lifecycle
In the vanilla web components article we already discussed the lifecycle callbacks. In Lit, we have a few more lifecycle callbacks which we will discuss in this article.
Boilerplate
To understand the lifecycle callbacks, we will create a new helper component. The task of the helper component is to
provide the user with the option to add or remove a component from the DOM as well as to change the attribute properties
of that component. Create a new file col-helper.js in the src/view/components folder and add the following code:
import { LitElement, html, css } from 'lit';
import { when } from 'lit/directives/when.js';
import { ifDefined } from 'lit/directives/if-defined.js';
import '@material/web/switch/switch';
import './circle-of-life';

export class ColHelper extends LitElement {
  static styles = css`
    nav {
      width: 50%;
      margin: 1rem;
      padding: 1rem;
      border: 1px solid gray;
      display: grid;
      align-items: center;
      vertical-align: middle;
      grid-template-columns: 1fr auto;
      gap: 1rem;
    }
  `;

  static properties = {
    showCol: { type: Boolean },
    counterValue: { type: Number, state: true },
  };

  constructor() {
    super();
    this.showCol = false;
    this.counterValue = null;
  }

  switchUpdateHandler(event) {
    this.showCol = event.target.selected;
    console.log(`------------------------------------`);
  }

  updateCounterAttribute() {
    const counterValue = this.shadowRoot.querySelector('#colCounter').value;
    if (counterValue) {
      this.counterValue = counterValue;
    } else {
      this.counterValue = null;
    }
  }

  render() {
    return html`
      <nav>
        <label for="colSwitch"> Remove/Add the Circle of Life component to the DOM </label>
        <md-switch id="colSwitch" @input=${this.switchUpdateHandler}></md-switch>
        <input type="number" id="colCounter" />
        <button @click=${this.updateCounterAttribute}>Set Value</button>
      </nav>

      ${when(
        this.showCol,
        () => html`<circle-of-life counter=${ifDefined(this.counterValue)}></circle-of-life>`,
        () => html``
      )}
    `;
  }
}

customElements.define('col-helper', ColHelper);
Note that we using the lit build-in directives when and ifDefined in the col-helper.js file. The when directive
is used to conditionally render the circle-of-life component based on the value of the showCol property. The
ifDefined directive is used to conditionally render the counter attribute of the circle-of-life component based on
the value of the counterValue property.
As can be seen from the imports in the code, we are using the md-switch component from the material web components
library. This component is not part of the standard web components library and needs to be installed separately. To
install the material web components library, run the following command in the terminal:
npm install @material/web
Next we have to add our new helper component to the home-page.js file in the src/view/pages folder. Add the
following code to the home-page.js file:
import '../components/col-helper';
And we need to add the col-helper component to the index.html file, by changing the body content to:
...
<body>
  <main>
    <col-helper></col-helper>
  </main>
</body>
...
Finally we also need to create a new file circle-of-life.js in the src/view/components folder and add the following
code:
import { LitElement, html } from 'lit';

const INCREMENT_VALUE = 1;
const ONE_SECOND = 1000;

export class CircleOfLife extends LitElement {
  static properties = {
    counter: {
      type: Number,
      hasChanged: (newValue, oldValue) => {
        console.info(`counter hasChanged ${oldValue} => ${newValue}`);
        return newValue !== oldValue;
      },
    },
  };

  constructor() {
    super();
    console.group('constructor');
    this.counter = 0;
    console.log(`counter=${this.counter}`);
    console.groupEnd();
  }

  connectedCallback() {
    super.connectedCallback();

    setTimeout(() => {
      console.group('setTimeout');
      this.counter += INCREMENT_VALUE;
      console.log(`counter=${this.counter}`);
      console.log(`output: ${this.shadowRoot.querySelector('output').textContent}`);
      console.groupEnd();
    }, ONE_SECOND);

    console.group('connectedCallback');
    this.counter += INCREMENT_VALUE;
    console.log(`counter=${this.counter}`);
    console.log(`output: ${this.shadowRoot.querySelector('output').textContent}`);
    console.groupEnd();
  }

  disconnectedCallback() {
    console.group('disconnectedCallback');
    this.counter += INCREMENT_VALUE;
    console.log(`counter=${this.counter}`);
    console.log(`output: ${this.shadowRoot.querySelector('output').textContent}`);
    console.groupEnd();
    super.disconnectedCallback();
  }

  firstUpdated() {
    console.group('firstUpdated');
    this.counter += INCREMENT_VALUE;
    console.log(`counter=${this.counter}`);
    console.log(`output: ${this.shadowRoot.querySelector('output').textContent}`);
    console.groupEnd();
  }

  render() {
    console.group('render');
    this.counter += INCREMENT_VALUE;
    console.log(`counter=${this.counter}`);
    console.groupEnd();
    return html`
      <h1>Circle of Life</h1>
      <p>Open the console to see the lifecycle callbacks</p>
      <p>Counter value: <output>${this.counter}</output></p>
    `;
  }
}

customElements.define('circle-of-life', CircleOfLife);
[!NOTE]
We make use of the
console.groupandconsole.groupEndfunctions to group the console output of the lifecycle callbacks. This makes it easier to see which lifecycle callback is being executed.
The lifecycle callbacks
Run the application and open the console. Make sure that the input field in the col-helper component is empty and your
console should be empty as well. If you now click on the switch in the col-helper component, you will see that the
circle-of-life component is shown.
Let's take a closer look at the lifecycle callbacks by inspecting the console output.
constructor

The first lifecycle callback function that is called is the constructor. Normally the constructor is called when an
new instance of the class is created with the new keyword. In our case, the constructor is called when the
circle-of-life component is created by using the tag <circle-of-life></circle-of-life> in the col-helper
component.
[!NOTE]
The first statement of the
constructorof a LitElement always issuper(). This calls the constructor of the parent class, which is theLitElementclass. TheLitElementclass is a subclass of theHTMLElementclass and provides the functionality to create custom elements.
The constructor is a good place to initialize properties with default values. In our case, we initialize the counter
property with the value 0. Notice that the assignment of a new value to the counter property triggers the
hasChanged hook function, which we defined in the counter property.
[!WARNING]
Never call functions that return a promise in the constructor! This can lead to unexpected behavior.
connectedCallback
The next lifecycle callback function that gets called is the connectedCallback. The connectedCallback is called when
the custom element is added to the DOM. This means that the tag of our component (in our case circle-of-life) is now
part of the DOM.
[!NOTE]
The first statement of the
connectedCallbackof a LitElement always issuper.connectedCallback(). This calls theconnectedCallbackof the parent class, which is theLitElementclass.
The connectedCallback is the place where you can perform tasks like setting up event listeners or assign values to reactive properties using asynchronous tasks like fetching data from an API or better the controller. Remember that assigning a new value to a reactive property will trigger a re-render of the component.
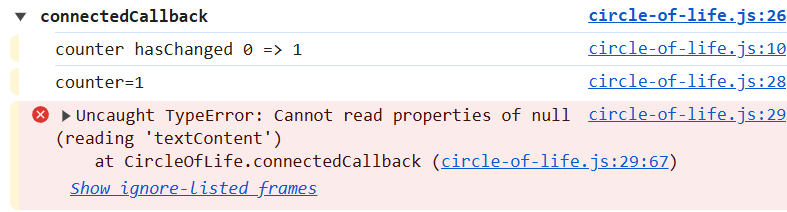
In the screenshot of the connectedCallback, you can also see that we get an error. This is because our code tries to
access the output element in the shadow DOM of the circle-of-life component. This is because the connectedCallback
is called before the render function is called, so while the tag of the component itself already is available in the
DOM the shadow DOM content of the component is not.
From the code in the connectedCallback function, you can see that we also use an asynchronous task to increment the
counter property, by setting a timeout of one second. From the console output, you can see that the
connectedCallback is finished before the setTimeout is executed. But when the setTimeout gets executed, the
counter property gets incremented by 1, which causes a re-render, which is exactly what we wanted.

render

The render function is called after the connectedCallback. The render function is responsible for rendering the
component's template.
[!WARNING]
The
renderfunction should be a pure function, meaning that it should not have any side effects. Therenderfunction should only return the template of the component.
In our case the render function is not a pure function, because we increment the counter property in the render
function. This is not a good practice and should be avoided. The render function should only be used to render the
template of the component. Fortunately, Lit seems to shield us from a race condition here, because the increment of the
counter property in the render function also triggers a re-render of the component, which would mean that we have an
infinite loop of re-renders. But Lit seems to prevent this from happening.
firstUpdated
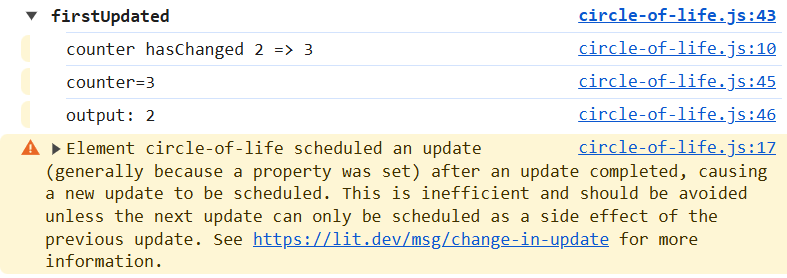
After the render function is called for the first time, the firstUpdated lifecycle callback is called. This means
that the shadow DOM content of the component is now available, as can be seen from the sceenshot (the output element
is now available).
The firstUpdated lifecycle callback should be used to perform tasks that require the shadow DOM content of the
component. This is the place where you can access the shadow DOM content of the component, so we can add for instance
event listeners to the shadow DOM content.
[!WARNING]
The
firstUpdatedlifecycle callback should not be used to trigger a re-render of the component, meaning that you should not assign new values to reactive properties in thefirstUpdatedlifecycle callback.
As can be seen from the warning in the screenshot, our code increments the counter property in the firstUpdated
lifecycle callback, triggering a re-render. This is not a good practice and should be avoided. If you need to assign a
new value to a reactive property, you should do this in the connectedCallback or in an event handler.
disconnectedCallback
When you now click on the switch in the col-helper component to remove the circle-of-life component from the DOM,
the disconnectedCallback lifecycle callback is called.

The disconnectedCallback is called when the custom element is removed from the DOM. This is the place where you can
perform tasks like removing event listeners or cleaning up resources.
[!NOTE]
The LAST STATEMENT of the
disconnectedCallbackof a LitElement always issuper.disconnectedCallback(). This calls thedisconnectedCallbackof the parent class, which is theLitElementclass. This is important because theLitElementclass does some cleanup in thedisconnectedCallback.
[!WARNING]
The
disconnectedCallbackshould not be used to trigger a re-render of the component, meaning that you should not assign new values to reactive properties in thedisconnectedCallback. Doing so will trigger a re-render of the component, which is not necessary because the component is removed from the DOM and can cause unexpected behavior.
Again we provided bad practice code in the disconnectedCallback function. We increment the counter property in the
disconnectedCallback function, which triggers a re-render of the component. This is not a good practice and should be
avoided.
Incomming Events
Try for yourself to see what happens to the lifecycle callbacks when you:
- Set a value in the input field of the
col-helpercomponent and click on theSet Valuebutton before thecircle-of-lifecomponent is added to the DOM. - Set a different value in the input field of the
col-helpercomponent and click on theSet Valuebutton after thecircle-of-lifecomponent is added to the DOM.